You are about to embark on a magical DIY journey to create stunning mirror wall art decor using items from the Dollar Tree and Totally Dazzled. In this video tutorial by Petalisbless DIY, you will learn how to turn simple dollar store mirrors into modern, fun, and glamorous pieces for your home. With bling wrap in gold and silver, adhesive gemstones, and your creativity, you can transform your space into a chic oasis. Subscribe to Totally Dazzled’s YouTube channel for even more fabulous DIY ideas and let your creativity shine!
Get ready to get crafty with foam board, hand glass mirrors, black glass mirrors, e6000 glue, and more to create your very own masterpiece. Follow along with Petalisbless as she guides you through each step of the process, from cutting the mirrors to adding the bling wrap and gemstones for that extra sparkle. Your DIY mirror wall art decor will not only elevate your space but also showcase your unique style and creativity. So gather your materials, put on your creative hat, and let’s get crafty together!
Materials Needed for the Project
To create this stunning DIY Silver & Gold Mirror Wall Art Decor, you will need the following materials:
Hand Glass Mirrors (From Dollar Tree)
Large Black Glass Mirrors (From Dollar Tree)
Bling Wrap Gold (From Totally Dazzled)
Bling Wrap Silver (From Totally Dazzled)
Foam Board (From Dollar Tree)
Adhesive Gemstones (From Walmart, Michaels, or Hobby Lobby)
e6000 Glue
Hot Glue Gun & Sticks
Metallic Spray Paint (Optional)
Make sure you have all these materials ready before starting the project to ensure a smooth crafting experience.
Instructions for Mirror Wall Art Decor DIY
Here are the step-by-step instructions on how to create your own beautiful Mirror Wall Art Decor:
Detach Mirrors from Frame
Carefully detach the mirrors from their frames by lightly pressing on them until they pop out.
Cut Bling Wrap Strips
Cut strips of Bling Wrap in both gold and silver colors to wrap around the mirrors.
Wrap Bling Wrap Around Mirrors
Wrap the Bling Wrap strips around the mirrors to add a touch of glamour and elegance.
Add Rhinestones for Decoration
Enhance the mirrors’ decorative appeal by adding adhesive gemstones around the edges.
Organize and Glue Mirrors to Foam Board
Arrange the mirrors on the foam board in your desired pattern and then secure them using e6000 glue and a hot glue gun.
Preparing the Foam Board
Trace Out Circles on Foam Board
Trace out circles on the foam board that match the size of your mirrors to ensure a perfect fit.
Detaching Mirrors from Black Frame
Gently detach the mirrors from the black frames using a firm but careful hand.
Gluing Mirrors onto Foam Board using e6000 and Hot Glue Gun
Secure the mirrors onto the foam board using a combination of e6000 glue and a hot glue gun for a strong hold.
Blinging Out the Mirrors
Wrap Silver Bling Wrap Around Mirrors
Wrap the silver Bling Wrap around the mirrors to give them a shimmering silver finish.
Wrap Gold Bling Wrap Around Mirrors
Similarly, wrap the gold Bling Wrap around the mirrors for a luxurious gold accent.
Adding Rhinestones for Decoration
Further enhance the mirrors’ elegance by adding rhinestones around the edges for a sparkling touch.
Assembling the Mirror Wall Art
Arranging Mirrors on Foam Board
Arrange the mirrors on the foam board in a pattern that you find visually appealing.
Gluing Mirrors Down with e6000 and Hot Glue Gun
Secure the mirrors to the foam board using a combination of e6000 glue and a hot glue gun for a strong and lasting bond.
Finishing Touches
Adding Additional Support to Foam Board
Ensure the foam board is adequately supported by adding extra pieces to reinforce the structure.
Hanging the Mirrors Using Command Strips
Use Command Strips to hang the finished mirror wall art securely on your wall for a polished look.
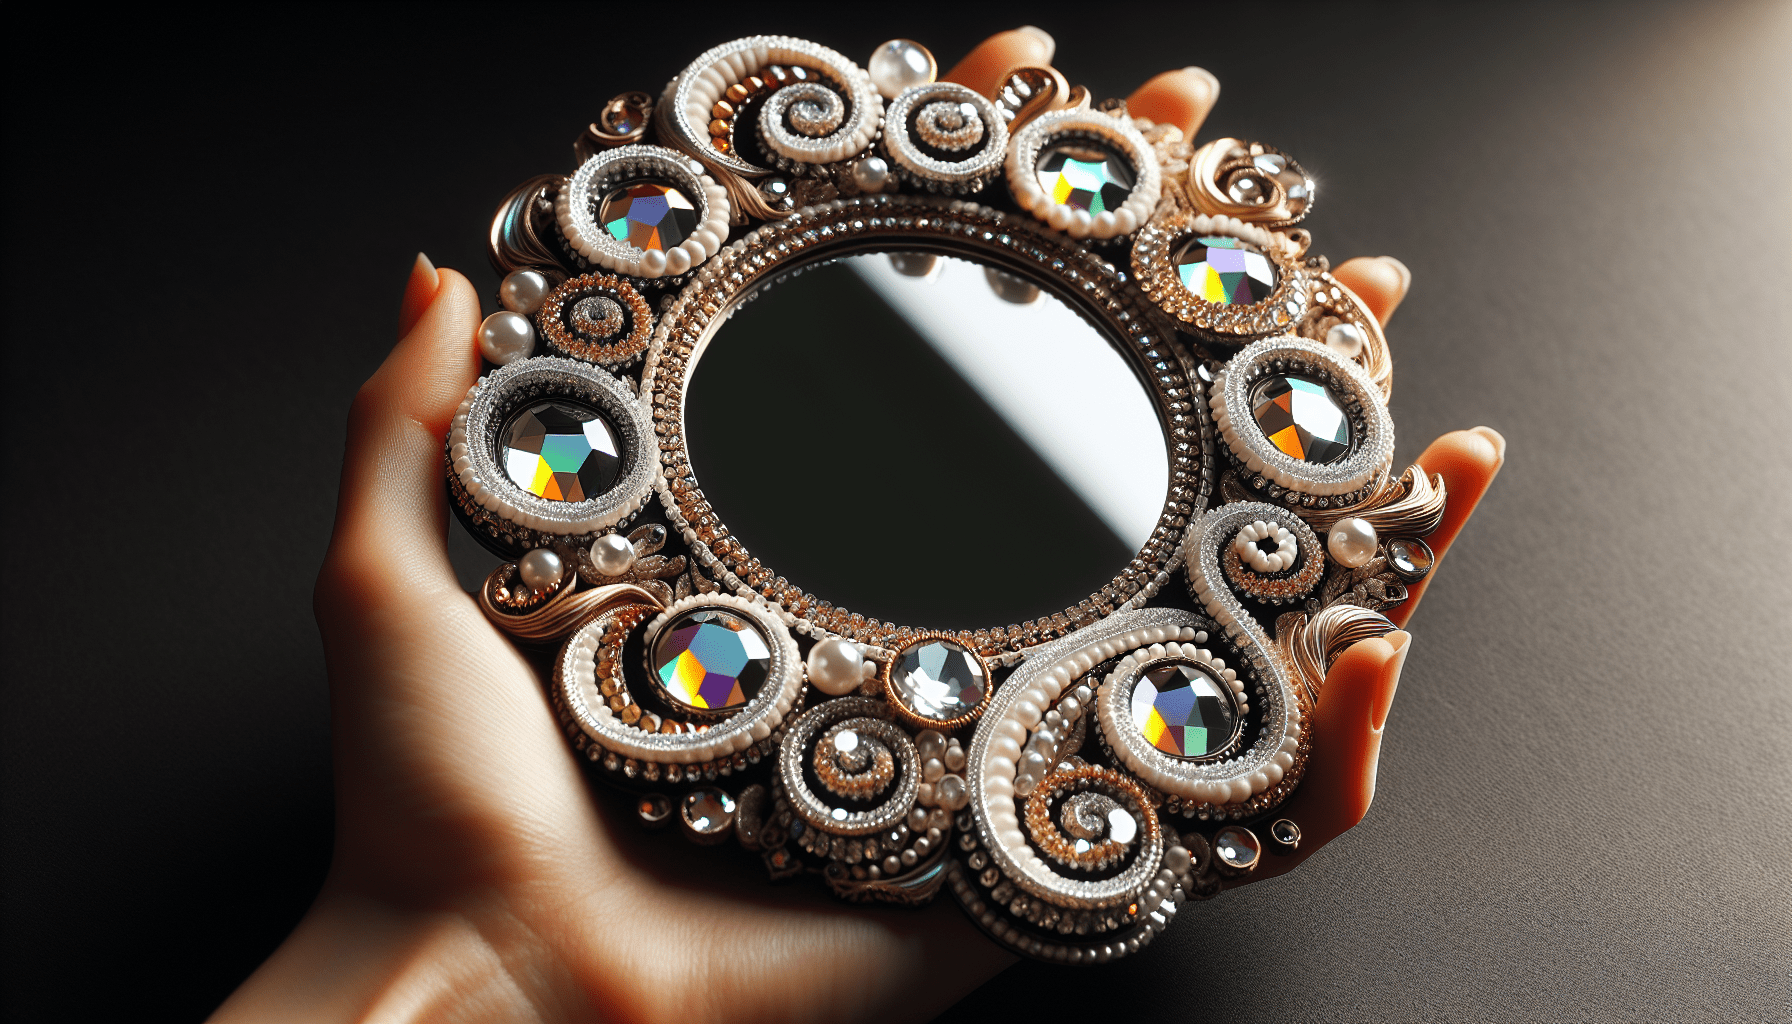
Finished Product
Once you have completed the above steps, you will be left with two stunning mirror wall art pieces:
Gold Blinged Out Mirror
Silver Blinged Out Mirror
These finished products will add a touch of glamour and sophistication to any space in your home.
Conclusion
In conclusion, this DIY project is a fantastic way to transform simple dollar store items into elegant and modern decor pieces. By following these instructions, you can create your own beautiful mirror wall art decor that will impress everyone who sees it.
Remember, don’t be afraid to get creative and try out your own DIY decor projects. It’s a fun and rewarding way to add a personal touch to your living space. So go ahead, gather your materials, and start crafting! You’ll be amazed at the beautiful creations you can make.